How to Move Apps from Internal Memory to SD Card on Android
One
of the great disadvantage you feel when using Android is that internal
memory becomes full. That's why New Android Smart Phones comes with 4GB
or above internal memory. But for some Old or Low End Android phones
will have low internal memory. An app developer can decide where should
the app must be installed. Usually they choose internal memory
considering speed and boot up. But since it is our phone and we bought
it, we should decide where it should be installed..!!
How to Make Free Calls without Internet [Must Try]
Steps :- 1. Download the app from below link. Click here to Download Hullo app 2. After installing Open the app and Login using Facebook account. 3. Now Grant Necessary Permissions > Login > Verify your Mobile Number. Finally Click on Contacts and Call from within the app.It will get connected and Enjoy Free Calls. Terms and Conditions :- 1. Unlimited Free Calls can be made only in India. 2. You need to Enable your Internet just to make a call.{ for just inetiate]
There are
plenty of useful backup solutions in the Play Store. Some for specific
purposes like backing up your text messages and others for an all-in-one
backup. Easy Backup & Restore is a Free app that lets you back up your Contacts, Call logs, Text messages, Calendars and Bookmarks.
Easy Backup doesn't back up your Photos, Music, Videos or Documents. These are very easy to back up yourself though using a USB cable and your computer: just locate the appropriate folders on your phone in a Windows Explorer window and Copy/Paste the contents to your computer.
2. When you launch the app you'll be asked if you want to Create a Backup. Tap Yes.
3. You'll
then see a bunch of check boxes next to the things you can back up:
SMS, MMS, call logs, calendar, bookmarks, dictionary and contacts. Make
your selections and tap OK.
6. You'll
then be asked to give the backup a file name.The date and time is the
default. If you have multiple devices you might want to modify the file
name to include the device you're backing up.
7. You'll
then see a progress page where your data is being backed up. Once
completed, you'll get a pop up window with a summary of what was backed
up.
8. If
your phone is rooted you can also backup your apps and app data. If
not, you can still tap on the Apps Tools tab in the main menu and
create a backup of the APKs on your phone. APKs are like an .exe on a
computer: it's the ''program'' or app package. If you've got your Google
settings enabled to backup your app data and settings (outlined above)
you can use this option to backup the apps themselves and Google's
backup to save the settings and data in the apps.
9. Just Check the boxes next to the apps you want to Save and Hit Backup at the bottom.
10. When
you want to restore your apps or data, just hit the Restore tab. You'll
be prompted to set Easy backup as the default SMS app. You can change
this back once your backup has been restored.
For better results choose wide area ad sizes like 300*250 Medium Rectangle or 336*280 Large Rectangle.
Customize your ad colors and click on save and get code button.
Select Synchronous in the code type and copy the ad code
Now parse this code using this HTML Parse Tool to change special characters into their corresponding HTML entities. The ads won’t appear if you use that code directly.
Now copy the parsed code.
Adding Google Adsense in Blogger Below Post Titles
Copy all the template code and paste it to notepad file
Press Ctrl+F and search for
<data:post.body/>
Now paste below code just above it.
<b:if cond='data:blog.pageType == "item"'> PLACE YOUR AD CODE HERE </b:if>
Replace PLACE YOUR AD CODE HERE with your parsed ad code.
Click on save template button.
You are done!
NOTE: Based upon your template, there are chances that you find multiple instances of <data:post.body/>. So try with all of them.
Once you performed these steps then visit any of your blog posts. Ad below post title will look something like this:
The ad below post title will appear at the left side. If you want to show it at the right side or at center then use below code.
<b:if cond='data:blog.pageType == "item"'>
<div align=”center“> // Please type this line manually. It can give you an HTML error. PLACE YOUR AD CODE HERE
</div> </b:if>
If you are unhappy with the results and want to wrap text around Google adsense ads like this:
then use below code.
<b:if cond='data:blog.pageType == "item"'>
<div style=”float:left; margin:10px;”> PLACE YOUR AD CODE HERE
</div> </b:if>
Replace left to right if you want to show ads on the right side wrapped with text. Note: Observe that all of the above codes are added between conditional tags
which will show ads only on post pages neither on homepage nor on
labels page. If you want to show ads on every page then remove those
conditional tags.
If you are showing ad on homepage and label pages also then take a
look on your ad. It will be shown below all post’s titles means if you
have set 5 posts to appear on your homepage then it will only appear
below first 3 post’s titles. Last two will be shown as blank white
space. I recommend you to show ad below first post title only. Replace
above conditional tags with below ones to show single ad on homepage and
labels page below first top most post’s title.
<b:if cond='data:post.isFirstPost'> PLACE YOUR AD CODE HERE </b:if>
Usually browsers for mobile phones support only English language(or
languages which has font similar to English). I have tried to read
online articles, tweets, news etc in Malayalam language
on different mobile phones. Most of the times only squares will be
visible due to no font available. Even if fonts are available, the
rendering will not be proper.
i showing you malyalam
After searching a lot I found a technique in which we can enable a feature in Opera Mini browser
which is available even for low end mobile phones with java/J2ME/MIDP
support. This will work for almost all language which has unicode
character maps available. eg:- Indian languages Malayalam, Hindi,
Kannada, Telugu, Punjabi, Gujarati, Bengali etc.
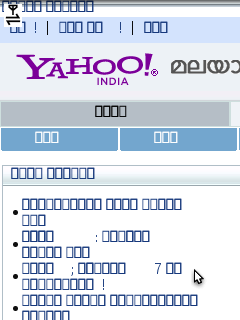
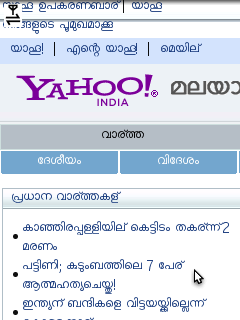
Opera Mini - Yahoo Malayalam page before changing the setting
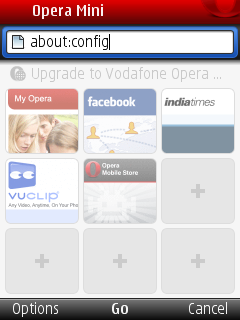
Inorder to read, we have to enable a special menu on the Opera Mini
browser by typing "about:config" in the address bar of Opera Mini and
click "Go".
Opera Mini - Address to open configuration page
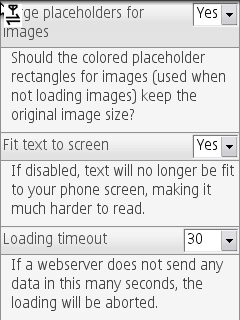
This will open a configuration menu as shown in the screen shot below.
Here we will be able to change lot of settings like feedindex,
linklists folding etc. In ths menu there will be an entry called "Use
bitmap fonts for complex scripts". By default this setting will be
disabled. Now change the setting to Yes and click Save.
Opera Mini config Initial Page
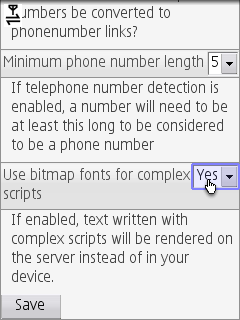
Scroll down to find the option "Use bitmap fonts for complex scripts"
Change setting to Yes
Click Save button to save the settings
What exactly happens ?
Usually while processing a web page for mobile phones in opera mini
servers, text will be sent as normal text and font information. So the
actual rendering of the font happens in the mobile. This method causes
comparatively less bandwidth. After the change in the setting, Opera
Mini server will render the text at server itself, then convert it to
bitmap images and then send to phone. So the phone will display correct
text.
Opera Mini - Yahoo Malayalam page after setting
This method works for other languages other than Malayalam also.So have
good time reading an article in your local language using mobile while
you are on move.
Note: Enabling this option will result in higher data rate. For
example, yahoo Malayalam site size is 91KB with setting and it was only
28KB before enabling the setting.
If you are upgrading Opera mini to a higher version, then this setting has to be done again.
How to Add More Than 100 Members in WhatsApp Group [Breaking the Limit]
Before
beginning with the steps let me tell you that you will be able to add
more than 100 members in any WhatsApp group you are an Admin of, To
cross the limit of 100 members in WhatsApp, there are something which
you will require, Oh! No extra software or hardware device, just simple
changes would work. Below are the things required :
Latest WhatsApp Installed (Since I’ve tried it with the latest version, I would recommend this)
Root Powered File Explorer (ES File Explorer)
Rooted Android Phone.
If
you are having all of these things ready with you then lets begin with
the steps so that without wasting a minute you can widen your circles
and can add more members to your existing circles to make them a part of
the group.
Step 1 : Open File Explorer (Used ES File Explorer Here)
The
first and the foremost thing you will need to do with the ES File
Explorer is, you need to enable the “Root Explorer” Option in it, To
enable the root explorer in ES File Explorer, Just Open it and swipe
from left and enable the Root Explorer by giving access to the
superuser. In case you are confused with enabling root explorer just
follow the sequence shown in the Image below.
Step 2 : Open the below shown Folder and Edit the WhatsApp_Preferences.
So
once you’ve given proper access to the Root Explorer and have enabled
root explorer then lets begin with the Editing WhatsApp_Preferences
File. So navigate to the following Directory : data/data/com.whatsapp/shared_prefs/com.whatsapp_preferences.xml and edit the com.whatsapp_preferences.xml file. Didn’t get the proper location? didn’t find the file? Follow the below image to reach the correct destination.
Step 3 : Edit the WhatsApp_Preferences.xml File using the Editor.
Once
you reach the above mentioned location, what you have to do is modify
the WhatsApp_Prefrences.xml file, Below is the part of the file which
you will have to modify so that you can add more than the existing
whatsapp group limit. Look for “int name=”participants_size_limit” value=”100″ and
replace the 100 by the maximum number of members/participants you would
like to have in your Group, Here I’ve replaced by 1000 because I want
1000 members in the WhatsApp Group, You can keep the number depending on
your needs. After changing it, save the file and close it.
Now
go to the App Manager and Force Close WhatsApp. After force closing
come back to WhatsApp and Turn it on and now create a group and add
members, you will see that the member limit which was previously 100 has
raised to the number you entered in the maximum participants in the
code.
That’s
all folks, Now you can add as many people you want in your WhatsApp
Group. At the end I would like to tell this is a trick which I came
across while testing some stuff. This information is just for
information purpose. Neither Droidmen nor the Author would be
responsible for any problems if they take place.

 How to Move Apps from Internal Memory to SD Card on Android


 How to Make Free Calls without Internet [Must Try]
 How to Keep your Apps and Data Safe in Android